
How to Read Piano Sheets: A Guide for Parents

Your child opens a piano book, sees a page of black dots and lines, and freezes. You look at it too, and honestly, it looks like code.

It isn’t. Learning to read piano sheets comes down to five ideas: where notes sit on the page, what they’re called, how long to hold them, which hand plays them, and how loud or soft to play. Once your child understands those, the page stops being a puzzle and starts being a set of instructions.

You don’t need to read music yourself to help. This guide explains each idea in plain language, shows how children usually learn them, and tells you what to expect at each age.

What Is a Piano Sheet, Exactly?

A piano sheet (also called sheet music or a score) is a written map of a piece. It tells the player which keys to press, for how long, in what order, and with which hand.

Piano music uses two staves joined together, one for each hand. That’s what makes it look busier than music for a single instrument like the flute or recorder. It’s also why the best way to learn is one small piece at a time.

Step 1: Learn the Staff and the Two Clefs

The staff is the set of five horizontal lines that every note sits on or between. Notes placed higher on the staff sound higher on the piano. Notes placed lower sound lower.

At the start of each staff you’ll see a symbol called a clef:

– Treble clef (the swirly one) is usually played by the right hand, covering the higher keys.

– Bass clef (the one that looks like a backwards “C” with two dots) is usually played by the left hand, covering the lower keys.

Step 2: Find Middle C First

Don’t start by memorising every note. Start with one landmark: Middle C, the C closest to the centre of the keyboard.

On the page, Middle C sits on a small extra line that sits between the two staves. Once a child can find it on the keys and on the page, every other note becomes “a step up” or “a step down” from somewhere they already know.

This is the biggest shortcut in learning to read. Beginners who anchor to landmarks tend to read by pattern. Beginners who guess note by note tend to stall.
 

child playing piano


Step 3: Learn the Note Names

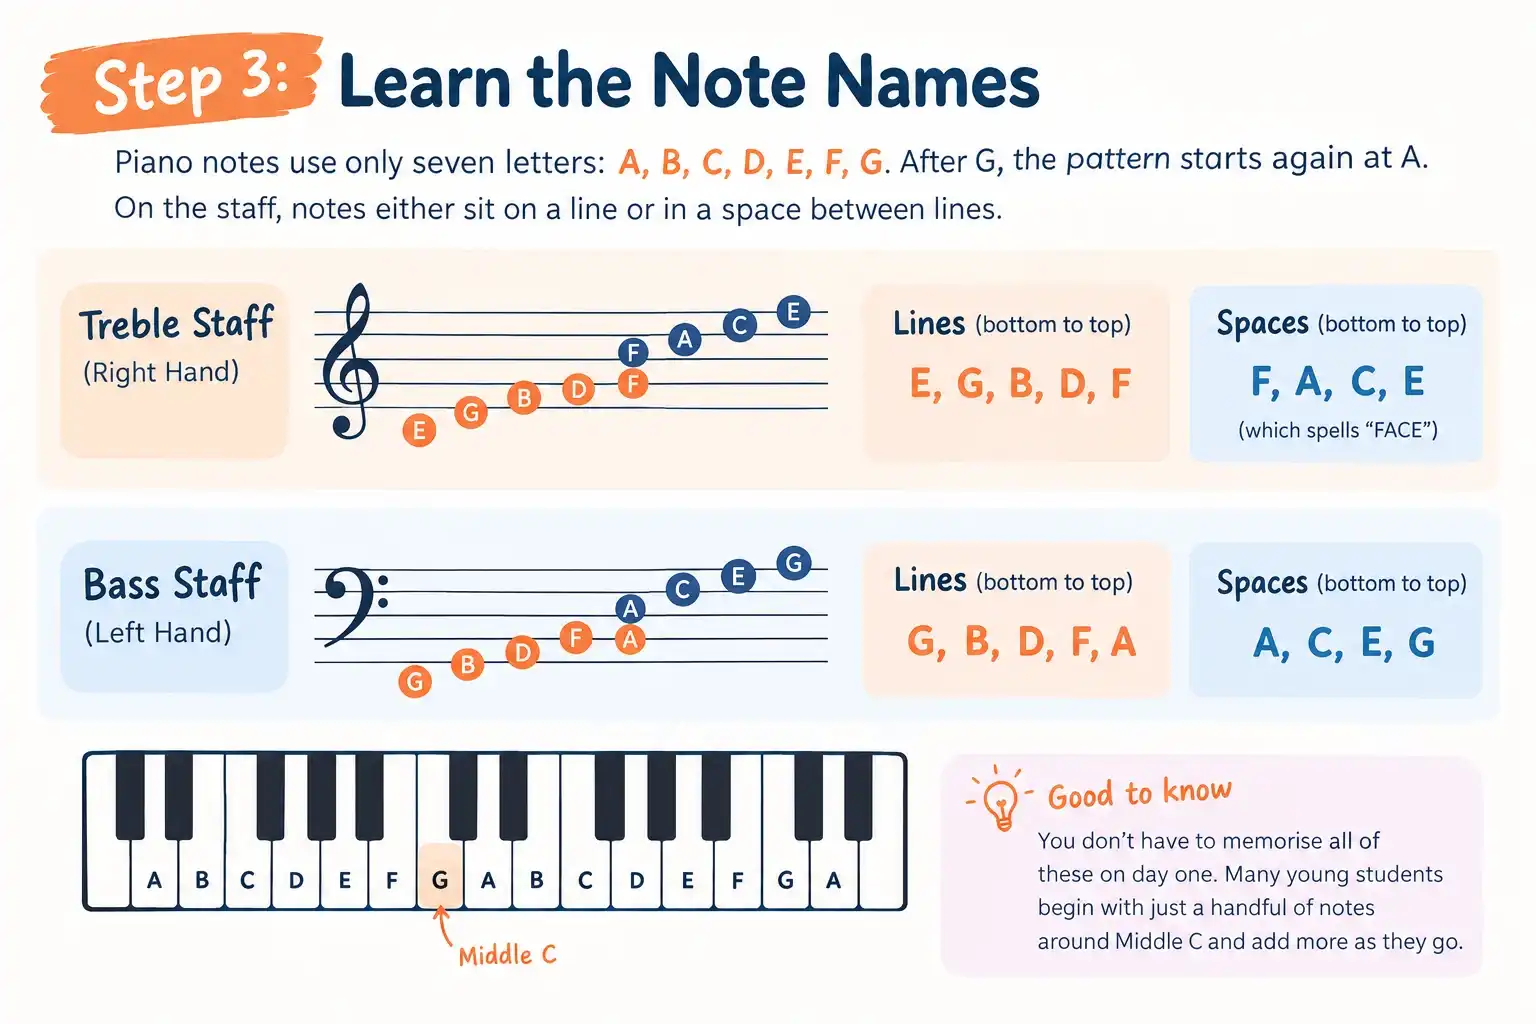
Piano notes use only seven letters: A, B, C, D, E, F, G. After G, the pattern starts again at A.

On the staff, notes either sit on a line or in a space between lines. Many teachers use short memory phrases for the treble staff:

– Lines (bottom to top): E, G, B, D, F

– Spaces (bottom to top): F, A, C, E (which spells “FACE”)

For the bass staff:

– Lines (bottom to top): G, B, D, F, A

– Spaces (bottom to top): A, C, E, G

You don’t have to memorise all of these on day one. Many young students begin with just a handful of notes around Middle C and add more as they go.
 

piano notes

Step 4: Understand How Long Each Note Lasts

Knowing which key to press is half the job. The other half is rhythm: how long to hold it.

The shape of a note tells you its length:

– Whole note (hollow, no stem): 4 beats

– Half note (hollow, with stem): 2 beats

– Quarter note (filled, with stem): 1 beat

– Eighth note (filled, with stem and flag): ½ beat
 

beginner piano

Step 5: Read the Time Signature

Near the start of the piece you’ll see two stacked numbers, like 4/4 or 3/4.

– The top number tells you how many beats are in each bar (the sections divided by vertical lines).

– The bottom number tells you which note gets one beat.

In 4/4, count “1-2-3-4” in every bar. In 3/4, count “1-2-3,” which gives the lilt of a waltz. Counting out loud while playing feels awkward at first, but it is the fastest way to build a steady pulse.

Step 6: Notice the Extra Instructions

Once the basics are secure, children start to notice the small markings that shape how a piece is played:

– Finger numbers (1 to 5, thumb to little finger) tell the player which finger to use.

– Dynamics such as p (soft) and f (loud) set the volume.

– Sharps (♯) and flats (♭) raise or lower a note to the nearest black key.

– Slurs and staccato dots change whether notes connect smoothly or sound short and crisp.

These come gradually. A child’s first pieces will have very few of them, and that’s intentional.

How Children Actually Learn to Read Music

Adults often assume reading comes first. For young children, it usually shouldn’t.

Most teachers build listening, rhythm and finger skills first, then introduce notation once the child is ready to connect the symbols to sounds they already know. A child who can already clap a steady beat and hear the difference between high and low is far better prepared than one handed a score cold.

This is how Gail’s Piano Studio structures its programmes:

– Ages 18 months to 4+ years (Orffie Explorers and Orffie Scholars): play-based music through movement, singing and rhythm. No formal reading yet, but this is where the groundwork happens.

– Around age 4 (Pre-Keyboard Program): a bridge between playful music exploration and keyboard readiness, where children start to meet the keyboard and early patterns.

– Ages 5 to 6 (Performer Keyboard): children begin working with simple notation alongside confident playing.

– Age 6 and above (Beginner Piano Program): systematic note reading, rhythm and technique, with the option to move into ABRSM exam preparation.

How to Help Your Child Read Piano Sheets at Home

You can support practice even if you’ve never touched a piano. A few habits make a real difference:

1. Keep sessions short and regular. Ten focused minutes most days beats one long weekend session.

2. Let them say it out loud. Ask your child to name the notes or count the beats as they play.

3. Use the “look, name, play” routine. Look at the bar, name the notes, then play it slowly.

4. Celebrate small wins. Finding Middle C unaided is a real milestone.

5. Don’t correct everything. Pick one thing per session, such as rhythm or note names, and let the rest go.

Common Mistakes Beginners Make

– Looking at their hands instead of the page. Reading only works if eyes stay on the score. Teachers gently train this from the start.

– Naming every note one by one. Fluent readers see shapes and patterns, such as steps, skips and repeats, not individual dots.

– Skipping rhythm because the notes are hard. Rhythm errors are the most common reason a piece sounds “off,” even when every note is right.

– Rushing ahead. A piece that’s too hard teaches frustration, not reading.

When to Get a Teacher Involved

Self-teaching through apps and videos can work for motivated older students. For young children, though, a teacher catches small habits early, such as hand position, counting and posture, before they become hard to undo.

A good teacher also matches the pace to the child. That’s what keeps a child confident enough to keep going.

About Us

Gail’s Piano Studio offers music classes and piano lessons in Bukit Timah, helping children build musical skills, confidence and creativity.

contact Us

Book your trial class today.

Share: